Although this is a recipe for potato cheese soup. It is more of a set of paintbrushes for one to fill his or her own canvas. For this recipe talks little of measurement, and much of listening and observation. This potato cheese soup took three hours to prepare and it was cooked in three separate stages. It is complex, and the quality of the ingredients (especially the potatoes and cheeses) will greatly determine the flavor of the dish. That being said, I prepared this meal for my family, which is four people. And in spite of how I prepared a tremendous amount of food, the entire vat of soup was completely eaten with zero leftovers. This was an achievement because none of us had ever eaten a dish like this before. Because quite frankly, this cheese soup had never been concocted before.
The three stages for this Potato Cheese Soup are as follows: First there is the stage of preparing the potatoes, vegetables, water base and seasonings. Second, there is the stage of preparing the second set of potatoes, the milk base, cheese, salts, sugar and the removal of large cheese lumps. Third, there is the final stage of combining the first and second stages into one large vat, and making modifications and boiling it down over the period of an hour or so.
The beauty of this soup is that the main ingredients are things that we often find laying around the refrigerator and pantry. These items are often neglected by bachelors and families alike, and so they will make great additions to your personal masterpiece.
First of all, you will need to realize that you will probably make too much food for you to eat in one sitting. So if you notice that is going to be the case, I recommend that you call a friend or family member and invite them over. This is because since there is a lot of dairy in this soup, I don’t think it would be that great of an idea to freeze and eat later. Refrigeration may be an option but sharing is always a better one.
You’ll notice that I’m not going to bother with an ingredient list, this is because this is more of a “kitchen sink” type of soup…that and precise measurements will actually work against you on this one.
To start, let’s cut up some potatoes. In the picture you will see we have two different types of potatoes. I had some sweet ones and some normal ones. The sweeter ones have the yellow color. These potatoes are going to get liquified and become part of the base of the soup. But we will have more potatoes later in Stage 2 that will be used for texture. The important thing about this step is to make sure that all the potatoes are peeled and cut into semi-small pieces. We don’t want any skin on them and also wash them so they are very clean. Boil them until they are soft. Once they get soft enough, take them out of the water and clean your boiling pot. You can let them hang out on a plate somewhere until you are ready to complete Stage 1.
The next step in Stage one is to boil broccoli and onions. They are going to be the main part of the Stage 1 along with the potatoes. Also, it is important to check around your refrigerator to see if you have anything else that you would like to add to the soup. One thing that I did was to chop up a lot of different types of nuts and add them to the boiling water. Even though I didn’t want to keep the nuts in for the final product, they would add a tremendous amount of flavor and good vibes to the hearty soup if they were allowed to boil long enough. I’d steer clear of spinach, that might not be the best texture for a dish like this. Cut the onions and broccoli into whatever sized shapes that you want for the texture of the soup. Remember, the onions will eventually liquify so there’s no pressure on that one. You’ll need to boil the broccoli and onions for a very long time. And once they are extremely soft take the potatoes from their plate and mix them with the broccoli and onions in the water.
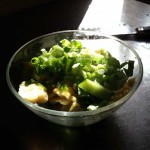
In preparation for Stage 2 you should check your miscellaneous things that you want to add to your soup. In my case I had some corn and here is where I actually added some bach choi. I had some lonely bach choi in the fridge and that made a nice addition. I used some green onion as well. Make sure the corn is already cooked and the bach choi should be as well. If it isn’t the soup will taste strange.
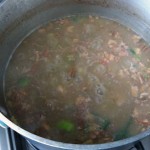
This next part of stage one will seem quite odd-looking because the nuts add a brown color to the soup. It was unappetizing to the eyes although it smelled quite good. The key here is to keep boiling the water for a long time for it to seriously liquify the stuff. The broccoli at this point should be unrecognizable and the onions should have disappeared completely. You will notice that the nuts are floating to the top of the liquid. Once the nuts have been in there for about 40 minutes, take them out with a spoon that has small holes in it. It shouldn’t be that hard to get them out. If you have extra time on your hands. You can actually save those boiled nuts in a small bowl and turn them into something else. But I didn’t have time to do it, so we’ll have to save that recipe for a future day. Once the nuts are gone turn the heat on the vat to simmer and let it boil down while you work on stage 2.
The reason why you had to clean out the pot for cooking the potatoes in Stage 1 when you were done with it, is because you are going to use that pot again to boil even more potatoes this time. But these ones are going to be larger pieces to add texture and visual appeal to your soup. In the meantime, you are still simmering your Stage 1 vat.
To continue with Stage 2 you need to only boil the potatoes until they are just cooked…not soft. Then clean the pot out again or make your assistant do that. Then begin work on the daily base for the soup. You will need a lot of milk and butter and a few pinches of brown sugar for the base of the soup. I used a bit of oil in order to prevent burning and to show me when the pot was hot enough. So first add some butter to the pot and then when it bubbles add the milk. Stir it all around and let it bubble but don’t let it reduce down too far yet. Once the milk is boiling and taste it and double check that it is not too sweet. If it is too sweet add more milk and boil it down more.
Next add the cheese to the pot. The amount of cheese is dependent on your preferences. Remember, that the cheese should be white cheeses like fresh Parmesan or Swiss or even provolone would work. Don’t use yellow or blue cheeses, that would just be gross. The fun and also frustrating part about the cheese addition is that you are just wanting to extract the cheese flavour from the cheeses. The actually fatty-sticky parts of the cheese will need to be extracted in a similar way that the nuts were extracted in Stage 1. Some of the cheese fat stuff will be allowed to stay in the pot but I’d remove about 70% of the really sticky cheese fat. But the trick is that we are going to wait to extract the cheese fat until Stage 3. So let it get all monstrous in there for a while.
At this point if you haven’t been standing over the hot stove for an hour and 15 minutes or more, then you’ve been skipping steps. Your feet are probably tired by now and you are getting hungry yourself. If you have a helper, that’s a plus side. But if you are cooking this alone, it may seem daunting by now, and family members may be getting anxious to eat. The aromas of the milk, potatoes and cheese are filling the house and everyone is wondering what you’re doing. This is your magikal soup. They will appreciate it when its done.
Now is the fun part. Add all the secondary items that you found in your fridge that you want to add to Stage 2. This includes the corn that I had and the green onions and bach choi. Add it all to the milk and cheese base of Stage 2 and boil it for some time. After twenty minutes or so, check the consistency and flavor. If it is too sweet, add more milk and boil it down more. If it is too cheesy…that’s OK, this is a potato cheese soup remember? If you get super concerned, you can remove the large chunks of cheese fat early. Keep stirring this and let it reduce down until you get a nice semi-creamy consistency.
Now is Stage 3. The soup in the vat in Stage 1 should have been reduced and now is more like a strange potato and vegetable paste. This is a good thing and that will make the overall soup hearty. If your Stage 1 isn’t thick yet, that is OK, it just means that you will need to reduce everything even longer during Stage 3 but it is no big deal.
Go ahead and take your milk based items in your Stage 2 pot and dump it into your large Stage 1 vat. And go and clean out all the Stage 2 items when you get a chance. This should be very strange because you will have this dark browning paste mixing with some yellowish milk base and you are wondering why you ever started cooking this abomination of soup. The Zen books I’ve been reading would probably applaud you for this, saying that you have been properly, “Arousing the doubt sensation.” Regardless, the decisions you make in Stage 3 will determine whether your dish becomes a disaster…or delicacy.
Increase the heat on the vat to boiling again, and stir the combination of the Stage 1 with the Stage 2 items so they become as homogenous as possible. Let it all bubble and boil after a few minutes at medium-high heat. Double check the consistency of the soup, is it too watery? Is it too thick? Right now it should be on the watery side, unless you made your Stage 2 extremely creamy. If it is watery, keep boiling and reducing it down, and in the meantime begin removing the large chunks of cheese fat. You will notice that the cheese fat will take good food with them as you remove them and dispose of it. (DO NOT FEED YOUR PETS OR FAMILY THE EXTRACTED REDUCED CHEESE FAT – this is heart-attack city stuff here) Do not feel upset if your corn or bach choi or even potatoes get pulled out along with the cheese fat. This is completely normal. Also, by removing the cheese fat, you will be able to boil and reduce the soup even faster, as well as make it easier to taste test the flavour.
While you boil the Stage 3, have fun tasting it along the way. If it is too sweet, add milk and butter. Then boil it more to reduce the think. I also added pepper and some salt during Stage 3 as well. This was done to taste. But remember that the cheese has basically butter-ish fat inside it so you shouldn’t need to overdo it with butter unless you added way too much brown sugar earlier.
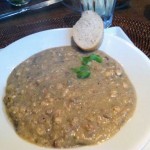
Once the soup if reduced to a semi-chunky and hearty dish. Serve it to yourself, your friends and family. You can look at the first picture at the top of this article in order to see what the finished product should slightly resemble.
Enjoy!
-Tyler


